

Using Photobucket to Upload Fantastically HUGE Pics Into Your Blog
*
I'd heard from other bloggers that the only way to place big photos upon your blog was to use Flickr or Photobucket. Pshaw! I said to myself. Who has time?! Take a picture, find it on my computer, upload it to ANOTHER website,and THEN somehow pull it into my blog account?! Nay sirree. I'd rather just stick with the simple, and known method of using Blogger to upload my pics one by one into my actual account. At least the pictures are then right in front of my eyes, stuck right into my blog account, and immediately ready to use once I've uploaded them. At least I accomplish the entire task with one click from one site.
*
At least I could sit by and watch my life wither before my computer screen whilst I waited for each photo to upload one-by-one-by-one, resulting in blog pics sized to fit an antique locket. they are soo teensy via blogger, aren't they?!
*
If you've held onto the same sort of philosophy, I'm here to change thy mind, my friend. Photobucket and Flickr will not only give you some seriously gigantic photo options for your blog, but their slick sites actually make uploading your photos online and onto your blog tremendously quick, not to mention, easy.
*
Gone are the days of uploading single shots into Blogger, with enough time to brew a cup of hot tea and compose an opera between upload sessions (seriously. Doth it not take FOREVER to upload each little picture via blogger?) Gone are the days of attempting to find your way into the workings of html, tinkering with the photo settings, with the result being sorta-big, grainy pictures in place of your little, slightly less grainy ones.
*
With Flickr and Photobucket, you can upload a boatload of pictures in minutes, then paste them into your blog in no time at all. It's simple as pie and you're going to love the results!
*
While I adore Flickr, I've been using Photobucket because I can purchase a professional account on a month-by-month basis for a mere $2.99/mo. This PRO account makes it possible to upload oodles and oodles of photos to Photobucket each month, edit them, and access them for blogging. If you are only posting on your blog once a week, you'll likely find the limited storage available through a free Photobucket account is more enough to meet your needs. If, however, you are a graphics geek (such as myself), be sure to check into the PRO option on Photobucket, which will offers significantly more gigs of photo storage for pennies per day.
*
A Flickr tutorial will arrive shortly. In the meantime, here's how you use Photobucket to place big, bright, beautiful photos upon your blog...
*
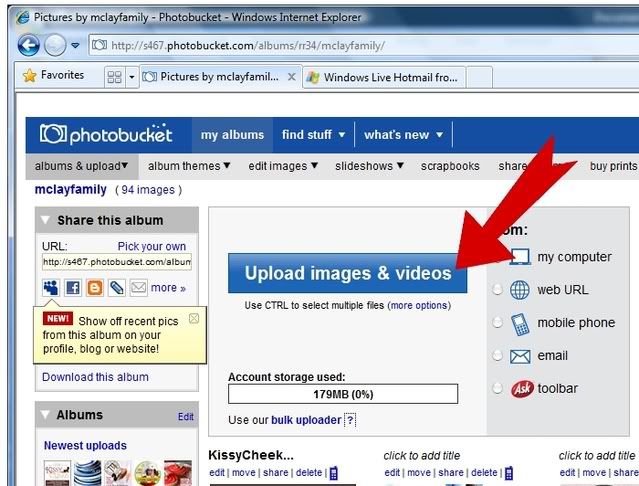
(1)
Get a free Photobucket account by clicking HERE. Log into your account and click on the UPLOAD IMAGES & VIDEO'S button. Select a picture, or a group of pictures, to upload from your computer.
*

(3)
*
(4)
*
*
(5)
(5)
With photo's uploaded, edited, and appropriately sized, it's time to post them into your blog. To do so, open a new tab in your browser and log into your Blogger account. Click NEW POST, then find your way to the EDIT HTML tag. Click on it. In that section, copy and paste the following code:
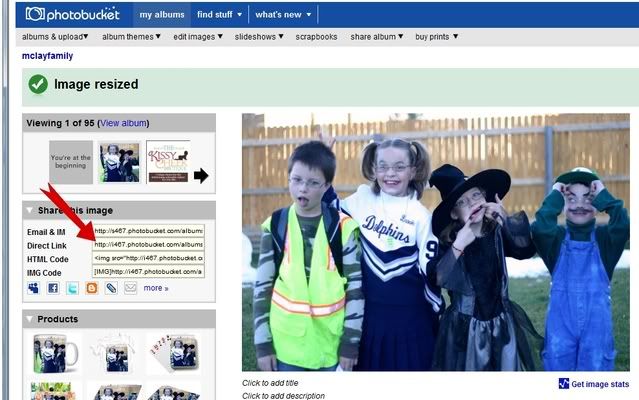
Now go back to Photobucket. Find the DIRECT LINK for your image (see example below). Copy it by highlighting it, then pressing CTRL+C. Return to your blogger account. In the HTML code that you've already pasted, highlight the entire text that sits between the quotation marks, then press CTRL+V to paste your Photobucket image link in it's place.
Repeat Step #5 as many times as needed, for as many pictures as needed.
•
Repeat Step #5 as many times as needed, for as many pictures as needed.
•
*
(6)
In your blog account, return to the COMPOSE tab. Your Photobucket photos should be there awaitin' your arrival. Blog as you usual, post as usual, and enjoy your new, big, beautimous blog pics!


5 comments:
What a treat!
All of these tips!
I'm new to the blogging world!
Will be back when I can sit for a spell!
Thanks for sharing!
XXOOXX
What an awesome tip. It's funny that I came across this today, I've been wondering about the PhotoBucket idea for the last several days, since my buttons are hosted there, but not the actual photos I feature in my post. Thanks for convincing me to use it full-time for all my pics!
I set up a Photobucket account because of your enthusiasm! I've been playing with it all week and learned that I can do a lot of fun things with the software. More specifically, I used it to edit my new profile picture! I've been on blogger since 2005 and just barely posted a self-portrait! Simple as it may be, I'm excited about it!
I just wanted to thank you for your detailed explanations regarding Photobucket.com. You inspired me to learn some new skills! I look forward to developing them further! Thanks again! And I wish you a very Merry Christmas! :)
QUESTION:
How come you are doing the "direct link" and then are you adding that extra text you showed an example of?? When I do photobucket on my blog, I copy and paste the html code and that's it- I'm done!
Did you not know that, or is it just a different way or doing it, or is one way superior over the other? Or is it the same??? (I am cocking my head to the side like a puppy now.)
Is there a way in which the profile picture can be made a little larger in blogspot.The profile pictures look too small to get a good view. In facebook at least we can do something. Can you write to me?
Thank you.
Post a Comment