Cheeky Secret #14
Three Tricks to Make Private Blog Advertising Work
*
So you've seen the notes on other blogsites, "Interested in Advertising? Email me for rates" and you're wondering what the secret is? How do you get people to email you, ask for rates, and start raking in an advertising profit for your blog? If only it was as easy as posting a note. The secret is, finding private advertisers usally isn't so simple. But, it's not neccessarily hard, either. Keep in mind these three simple tips, and you'll be on your way to making cash through private ads in no time at all!
*
(1)Remember, this is business. Appear professional.
(1)Remember, this is business. Appear professional.
Never, never, never post a note on your sidebar inviting readers...
"Want to Advertise? Email me at InMyPajamas@Home.com"
Yeeps! The very thought makes my spine cringe.
*
If you were looking to hire a realtor and could choose between one who arrived at appointments in old-school basketball skiviies and a sweat band, or one in a slick grey suit with sassy red heels, I'll bet you twenty bucks I know who you'd choose.
If you were looking to hire a realtor and could choose between one who arrived at appointments in old-school basketball skiviies and a sweat band, or one in a slick grey suit with sassy red heels, I'll bet you twenty bucks I know who you'd choose.
*
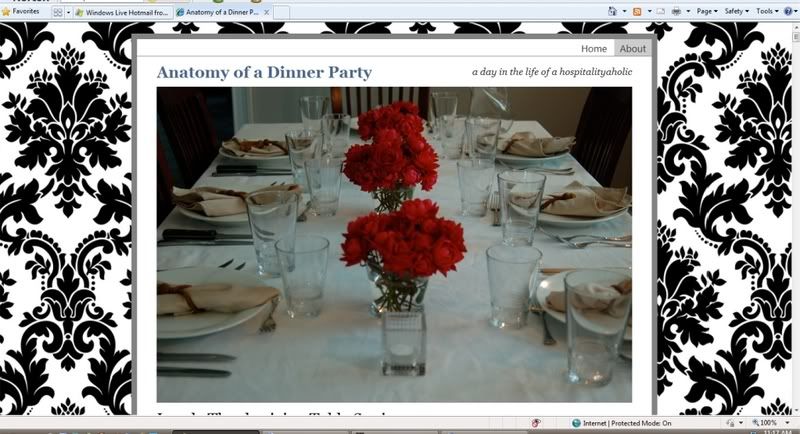
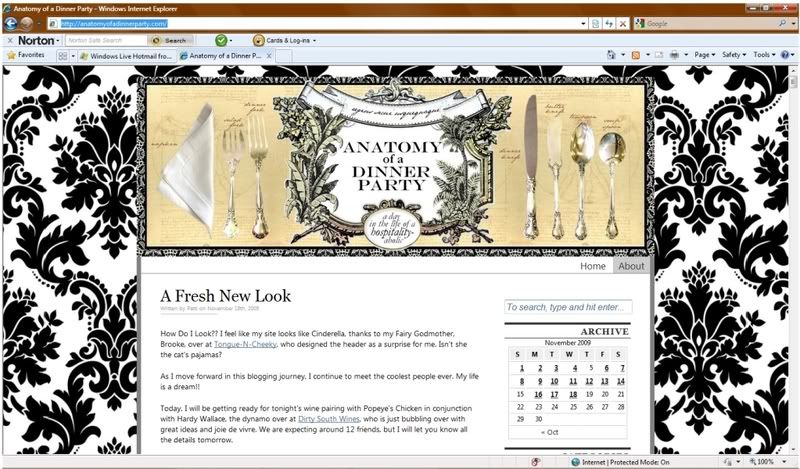
Likewise, if you want to earn advertising money through your blog, you've got to get your professional game on. You've got to look the part of a serious business gal. Since you'll rarely meet advertisers in person, this means need to get a simple, professional looking ad site which details your ad rates, ad dates, and contact information. I've done this by linking readers and potential advertisers from my site to a totally different blogsite. (CLICK HERE to see it.)
*
Don't hesitate to post your actual ad prices on your ad site. If I'm an advertiser looking to spend my money, I want to see the prices. If the prices are within my ad budget, I'm significantly more likely to contact you than if I hop on your blog and see a note that says "Doing laundry and wiping kids noses. Call me when you're ready to advertise." Uh, no thanks.
*
(2) For the most part, you'll find your advertisers. They won't find you.
The sooner you see yourself as a salesperson, the sooner you'll start making bucks from your blog.
*
(2) For the most part, you'll find your advertisers. They won't find you.
The sooner you see yourself as a salesperson, the sooner you'll start making bucks from your blog.
*
Business owners are busy people. They are managing money, books, products, customers, websites. Very few of them have time to troll the web, find your blogsite, figure out if your writing style and theme compliments their company, contact you about advertising, negotiate a price, and maintain an account with you. Which means that YOU get to be the one to find your advertisers. Search them out, hunt them down, email or call them, tell them why they need to advertise on your site to your specific audience. Sell yourself to them and they might just buy.
*
One "secret" I've used to hook potential advertisers is to contact them and let them know how genuinely I enjoy their products. I tell them about my blog, let them know my site stats, and then ask them if they'd be interested in sponsoring a giveaway in exchange for a month of free sidebar advertising. Sometimes they are not interested, and that's okay. But, sometimes they are actually VERY interested and wiling. These are the companies worth building and maintaining relationships with.
*
Because they've shown an initial interest in your blogging endeavors, you can feel assured that they are a company interested in (1) advertising, (2) joining forces with you, (3) testing the success rate of your readership with their company. Keep in touch with them! Email them, send them special ad offers, let them know when you have a post of particular interest to their cause then invite them to be an advertiser for that post, send your gratitude, check in with a hello or note of appreciation. Thoughtfulness and professionalism can will take you far in business.
*
*
(3) Larger advertisers are attracted to larger audiences.
If you have to start small, don't be discouraged.
As you look for advertisers, look for companies that are equal in size to your reader following. If your blog is seeing two hundred hits per day, a major corporation is highly unlikely to be interested in sponsoring you. However, that doesn't mean other, smaller companies aren't looking to increase their audience and profits.
As you look for advertisers, look for companies that are equal in size to your reader following. If your blog is seeing two hundred hits per day, a major corporation is highly unlikely to be interested in sponsoring you. However, that doesn't mean other, smaller companies aren't looking to increase their audience and profits.
*
The real key to success here is to seek out privately owned websites who ship their products. These companies are constantly looking for online saavy consumers because online is how they hock their products. So, a small bakery, clothing store, antique shop, or craft venture is significantly more likely to join you as an advertiser than a toy shop with a storefront in your hometown.
*
The best news? There are so many online companies! Get googling! Start Emailing! Pick up the phone and call some contact numbers! The sooner you start selling yourself as a professional, legitimate, success-driven blogger, the sooner you'll start being that very thing.
*
Which Cheeky Secrets are working for you?
Have you been putting the Cheeky Secrets into play on your blog?
Has one of them proven successful for your site? If so, I'd love to hear!
*
Email your successful blogging stories to becheeky@q.com
and you might be featured in an upcoming post.
*